We will learn this exercise first in the key of C Major with no sharps or flats. You will need to place your hands in the C Major position. The thumb of your right hand will be on middle C and the little finger of your left hand will be on the C below middle C.
We will count 1,2,3,4.
When you learn the exercise well, you can move your hands up eight notes (an octave) and your teacher or your friend can play the automatic chords which are noted above the staff. Next a rhythm can be added for more enjoyment. Start out with a metronome marking of 70 and gradually increase your speed.

We can raise and lower pitches by putting a sign in front of the note, or by putting sharps or flats in the key signature which appears at the beginning of each music staff.
A sharp raises a note by one-half step (the very next key to the right). The raised note may be a black key, or it may be a white key, but the sharp will be to the right of the original pitch. In this lesson all sharps will be on the black keys.
A flat lowers a note by one-half step (the very next key to the left). It may be a black or a white key, but in this lesson all flats will be black keys.
A natural restores the note to its original pitch without the sharp or flat.

If the top number is 4:

If the top number is 3:

If the top number is 6:

There are other meters, but these are the three most common and we will be studying those signatures.
In the following examples observe that a:
|


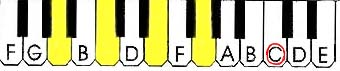
The bass lines can be remembered with "Great Big Dogs Fight Animals" G,B,D,F,A. The first line in the bass is the second G below middle C (circled in red). We "skip" from line to line, skipping a letter in between to find these new notes.
To remember the signal for the lines say "Grrr" like an angry dog. This will help you to recall that "Great Big Dogs Fight Animals", G,B,D,F,A; the bass lines

 |
 |
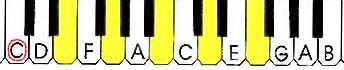
We remember the bass spaces by saying, "All Cars Eat Gas", A,C,E,G. These are the bass spaces. The A is the second A below middle C (circled in red). We "skip" from space to space, skipping a letter name in between.
Let's learn a signal. Pretend you have a steering wheel in your hands. Turn the wheel as you "drive". This will remind you that "All Cars Eat Gas", A,C,E,G, the bass spaces.

 |
 |
To help us remember the treble lines we say, "Every Good Boy Does Fine". The names of the line notes in the treble are E,G,B,D,F. From one line to the next is a "skip". We start on the E above middle C (with a red circle) and we skip a letter name as the notes ascend, or go up.
Our signal for this reminder is the American Sign Language sign for "boy". Pretend you are wearing a cap with a bill on it. Touch the "bill" and move the hand down and away from the face. This sign for "boy" reminds us that "Every Good Boy Does Fine", E,G,B,D,F, the treble lines.
 |
 |
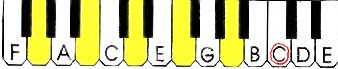
The treble spaces spell the word "face" F,A,C,E. The first space F is the first F above middle C. The distance from a space to a space is a "skip". You skip a letter when naming the notes.
Your teacher may use a signal to remind you of these notes. Here's one I use. Put your open palm in front of your face. Rotate it as if washing a window. This will remind you that the treble spaces spell "face", F,A,C,E.
 |
 |
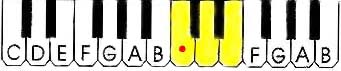
Begin with the thumb of the left hand on middle C. In the first measure we step down from middle C (line) to B (space) to A (line), to G (space) to F (line). Your 5th finger (little finger) is on F in the bass clef.
In the second measure, the 5th finger is on F (line). Step up to G (space), then up to A (line), up to B (space) and back up to middle C (line).
Count 1,2,3,4 as you did in the previous songs.
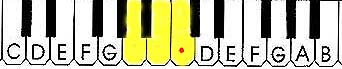
Begin with the thumb of the right hand on middle C with a red dot (line). Step up to D (space), then up to E (line), up to the next key F (space) and on up to the next one, G (line). Your 5th finger (little finger) will be on G.
G is a white note with no stem. We call this a whole note and it gets all 4 counts in 4/4 time. In the 6th measure we have two G's that are white notes with stems (half notes). Each of these notes gets two counts.
This song begins with the thumb of the left hand on middle C. In the first measure we step down from middle C (line) to B (space) to A (line). In the second measure, the third finger is on A (line). Step up to B (space), then back up to C (line).
Count 1,2,3,4 as you did in the previous song.
If you do not have a musical keyboard near your computer, make a copy of the mock keyboard as directed on the first page of these lessons. It will be helpful to you in learning the keyboard.
When the notes on the staff go from a line to a space or from a space to a line, we step up or down to the next note letter.
In the first measure we begin with the thumb of the right hand on the red-dotted middle C (line). Step up to D (space), then to E (line).
In the second measure, the third finger is on E (line). Step down to D (space), then back down to C (line).
This song is written in 4/4 time which means that we count 1,2,3,4 and the black note with a stem (quarter note) gets one count. The white note with a stem (half note) gets 2 counts.
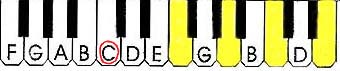
The keyboard is made up of white keys with repeating patterns of black keys in groups of two and three.
We use seven letters of the alphabet to make music; A,B,C,D,E,F, and G. After G, we start over again with A.
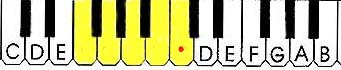
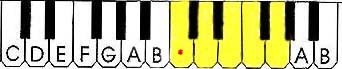
Look at the group of two black keys. C will always be to the left of the two black keys. E will always be to the right of the two black keys. And D is right in the middle of the two black keys.
Now look at the group of three black keys. F will always be to the left of the three black keys. B will always be to the right of the three black keys.
Each key on the keyboard has a particular tone or pitch, and a certain place on the music staff. You will learn how each tone relates to a line or space, and you will be able to find it on the keyboard and combine the notes to make beautiful music.
